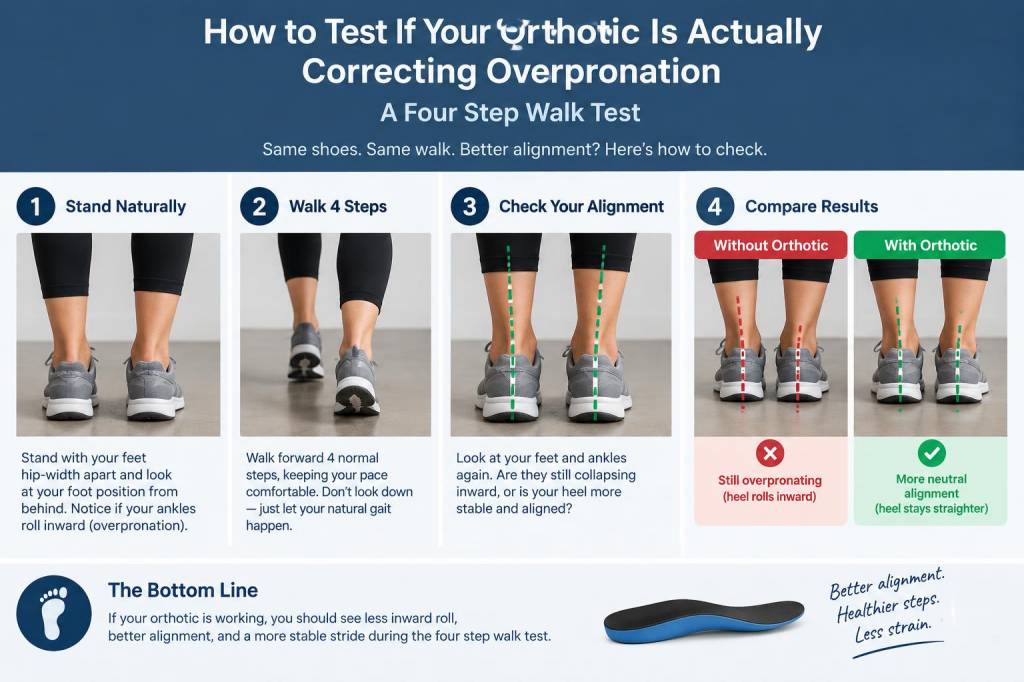
I often get asked whether orthotics actually correct overpronation — and the honest answer is: it depends on the device, the fit, and how you test it. Overpronation isn’t just a label; it’s a pattern of movement that can be subtle or dramatic, and the best way to know if an orthotic is doing its job is to observe movement in context. Below I share a simple, practical four-step walk test I use with clients and at home to see whether an orthotic is genuinely changing foot mechanics during walking. You can do this in your hallway or on a short stretch of pavement with minimal equipment.
What I mean by “correcting overpronation”
When I talk about correction, I’m not expecting an orthotic to make your foot rigid or unnaturally “perfect.” What I look for are measurable and repeatable changes that reduce excessive inward roll of the foot and ankle during stance — things like a more vertical heel, reduced collapse of the arch, and smoother transfer through the forefoot. The goal is improved alignment and load distribution, not perfection.
What you’ll need
- A pair of shoes you usually walk in (not brand-new trainers with stiff soles).
- Your orthotics (the ones you’re testing).
- A smartphone or camera — ideally set to record video.
- A marker — something easy to stick on clothing (tape or a sticker) or just use visual reference points.
- A short straight path (6–10 metres / 20–30 feet).
How the four-step walk test works
The test compares walking with and without the orthotic in a controlled way. I recommend recording each pass so you can replay the footage and look for consistent changes. Try to wear the same socks and shoes for both trials and walk at a comfortable, natural pace.
Step 1: Baseline walk (no orthotic)
Walk the length of the path 4 times while recording: two passes with the camera facing you and two passes with the camera from behind. If you can have someone film, ask them to stand about 3–4 metres away and keep the person in frame from knee to ankle. If you’re filming alone, prop the camera on a chair or a wall at knee height. Focus on the rearfoot and lower leg — you want to see heel strike through the stance phase.
What I watch for:
- Heel position at contact: Does the heel strike almost straight, or is it tilted noticeably inward?
- Medial collapse: Does the arch appear to drop and the ankle roll inwards during mid-stance?
- Toe-off line: Is the push-off directed medially (toward the centreline) instead of forward?
- Symmetry: Is one side worse than the other?
Step 2: Insert the orthotics and settle in
Put your orthotics in and stand for a few minutes. Walk around the room for 5–10 minutes to let your feet and nervous system adapt to the new cues. Immediate changes can happen, but a short warm-up helps you avoid misinterpreting initial odd sensations as failures or successes.
Step 3: Repeat the recorded walks (with orthotic)
Repeat the same four filmed passes with the orthotics in place: two facing and two from behind. Keep your walking pace and path identical to the baseline trial. After you finish, compare the clips side-by-side. On a smartphone you can often split-screen or flip between videos for a quick comparison.
What I look for when comparing:
- Reduced heel eversion: The heel should be visibly less tilted inward at contact and through mid-stance.
- Higher medial arch: You should see less flattening of the arch when weight is applied.
- Cleaner ankle alignment: The lower leg should be more vertical over the foot.
- Smoother push-off: The forefoot should roll forward rather than roll inwards, and toe-off should feel more efficient.
Step 4: Subjective check and small tweaks
Movement changes are important, but your body’s feedback matters too. Walk another 2–3 passes without recording and notice how your feet, calves, knees, and hips feel. Ask yourself:
- Do I feel more supported under the arch?
- Is there less aching at the inside of the ankle or knee?
- Do I feel any new hotspots, tightness, or pressure points?
If you notice improvement in alignment but new pressure points, the orthotic might need trimming, or the shoe might be incompatible. Many prefabricated orthotics (e.g., Superfeet, Dr. Scholl’s, Powerstep) are designed to be trimmed to fit; custom orthotics require a visit back to the prescriber for adjustments.
Practical tips to improve the accuracy of your test
- Use consistent shoes: Different shoes change how an orthotic works. Test in the pair you intend to wear regularly with the orthotic.
- Mark anatomical landmarks: If you want higher precision, place a small sticker on the lateral malleolus (outside ankle bone) and knee cap to visually compare angles between trials.
- Record slow-motion or use a higher frame rate: This makes it easier to see subtle heel tilt and mid-stance behaviour.
- Repeat over several days: Some changes emerge only after you’ve adapted for a few walks.
- Compare both sides: Asymmetry can tell you whether one orthotic or both are working equally well.
What a successful correction typically looks like
From my experience, a helpful orthotic will produce at least one or more of the following during walking:
- Noticeably reduced inward tilt of the heel at contact and during mid-stance.
- Less visible collapse of the arch when weight is applied.
- Smoother, more forward-directed push-off.
- Reduced pain or strain sensations in the arch, medial ankle, or knee within a few walks.
When the orthotic isn’t helping — and what to do
If you don’t see changes in alignment or you feel new pain, consider these possibilities:
- Fit mismatch: The orthotic may not sit correctly in the shoe or under your foot. Try a different shoe or trim/replace the orthotic.
- Wrong prescription: A device designed for mild pronation may be insufficient for a more pronounced pattern. Talk to the clinician who provided it.
- Compensations elsewhere: Tight hips, weak glutes, or calf stiffness can maintain overpronation despite orthotic support. Combine orthotics with targeted mobility and strengthening exercises.
- Need for gradual adaptation: Some people need a progressive wear schedule (start 1–2 hours a day and gradually increase).
When to consult a professional
If your test shows no improvement but pain persists, or if you’re unsure how to interpret the videos, book an appointment with a podiatrist, physiotherapist, or orthotist. They can assess dynamic alignment with clinical tests, gait analysis tools, and, if needed, adjust or remap the orthotic prescription. Custom orthotics offer more control but still require follow-up fine-tuning.
Testing at home doesn’t replace clinical assessment, but this four-step walk test gives you a clear, repeatable way to see whether your orthotic is changing the way your foot and ankle move. Take photos or short videos, note how your body feels, and don’t hesitate to use this evidence when discussing adjustments with a clinician — it makes the conversation concrete and helps you get a device that genuinely supports your step.